Photographing Your Own Work
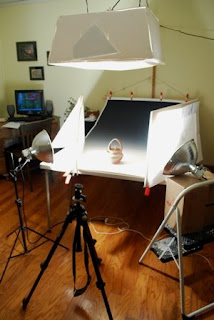
I thought I'd show my photo booth display and explain a bit how I shoot the images of my own work. It's really not that hard if you just take a few steps in getting the right things. A lot of my setup seems pretty rigged up with homemade parts, but it gets the job done quite nicely. In the end you can save yourself a lot of money by doing it yourself.
 It helps to set up your display in a room where you have a wide floor area to work in, preferably a dark room with no windows, or try to shoot at night. If this doesn't work, set up dark curtains or tape cardboard over your windows. The glare from the windows will show up on your pots! I am lucky in that I have an extra room where I can leave the majority of my photo display up even when I'm not using it so it's relatively easy shooting new images every now and then.
List of things I use:
1. Gradated Paper
http://www.phototechinc.com/graduate.htm
(Photo Tech, Inc. St Paul, MN). I buy mine through this company for around $60 and got a gradated paper that is white to black, but the gray to black one is nice. Gradated is great because it helps you create a shadow in the back which gives that three dimensional feeling in your photograph of your pot without the piece looking like it's floating in the middle of nowhere. This company has a couple of sizes, I bought the biggest one they have, which is 42" x 62", but remember that size can be limiting if you have very tall pots or very wide pots. The majority of my work fits well on this size of backdrop except for my wide and tall basket and vase forms. Or you could buy a plain gray backdrop at a photography supply store, that might come bigger, and if you go this route, then just cut some black cloth in zig zag lines, hang it above your paper from the ceiling, and it will cast the appropriate shadow onto the background. This way might be cheaper and then you'd have a bigger backdrop for taller and wider pieces.
2. Hanger for wall: You'll need to make some sort of thing to hang this paper from the wall. I screwed a strip of wood to the wall. It has several nails on it so you can choose which height you want your paper.
3. Clamps: Then you need some clamps to clamp the top end of the paper to a dowel rod, or some other thin strip of wood. You can get heavy duty ones at Lowe's, they are metal with bright orange handles. Then you can rig up a string that comes from both ends of this paper hanger, and that will then hang onto the nails on the wall.
4. 3 Clamp Lights from Lowe's, these are the silver reflector light holders that later you will put your own bulbs in. They are not made for high temperature bulbs, so you have to turn off your lights often to be safe!
5. 3 Light Bulbs: Whatever you do, the light source has to match your camera...
If you are shooting film, with tungsten slide film, you have to use tungsten photo flood bulbs from a photo store, Iris in Asheville usually has them. Or you can use these bulbs with your digital camera and then set the white balance that is on your digital camera according to the tungsten lights.
I shoot digital now, so I don't use tungsten photo bulbs anymore. I just bought 3 utility bulbs 300 watts from Walmart. Then I still adjust the white balance on my camera to match the light source. This is the key thing you want to make sure you set right so the color is correct and you don't get blue or yellowish images. These bulbs get very hot in the light sockets, so be aware and always turn them off inbetween setting up your next image.
I use a gray card to adjust the white balance on my digital camera. I turn all my lights on and put the gray card on the table and take an actual picture of the gray card with the light illuminating of it. This setting is then recorded in my camera for the remainder of my shooting.
7. Foam Core and Cloth for Light Box and Diffusers:
I made the light box that hangs from the ceiling out of foam core from Michael's craft store. You'll need 6 pieces for it, it's sort of a trapezoid form?? This part doesn't matter it's just nice that it's lightweight, hangs from the ceiling, and it holds one of the clamp lights with one of the lightbulbs in it. The bottom of the lightbox has white cloth strapped over the bottom so that the light shines through this....you can cut a window in the foam core to create a place to put this fabric. Hang the lightbox from the ceiling. Then use string or wire to connect the light box to these hooks and that way it is adjustable depending on how high you want your lightbox.
Diffusers for the side lighting: Foam core and fabric...make 2 or 4 for extra in case you really have a hot spot or glare you can't get rid of.
Fabric: you can use any thin white cloth to help diffuse the light. Mount it onto a foam core sheet with a window cut out of it that the cloth is stretched over.
8. Hairspray! Sometimes works to dull down hot spots or high glare areas on your glossy beautiful pots.
9. Tripod! an absolute must....I love photography, so I like shooting purely in a manual setting, using manual focus and adjusting the shutter speed down to a slow speed with a high aperture. This creates a good depth of field to help in getting a sharper detailed picture of your pot.
 Good luck! If anyone ever has any questions and this LONG post didn't do enough for you, you can always email me!
Another place you can find all kinds of information is John Glick's blog Fresh Plums, which is a blog all about photography for potters!
Joy
joy@joytannerpottery.com
Comments
John
c